Saxony Vaccination Date Autochecker

TL;DR: Get it here!

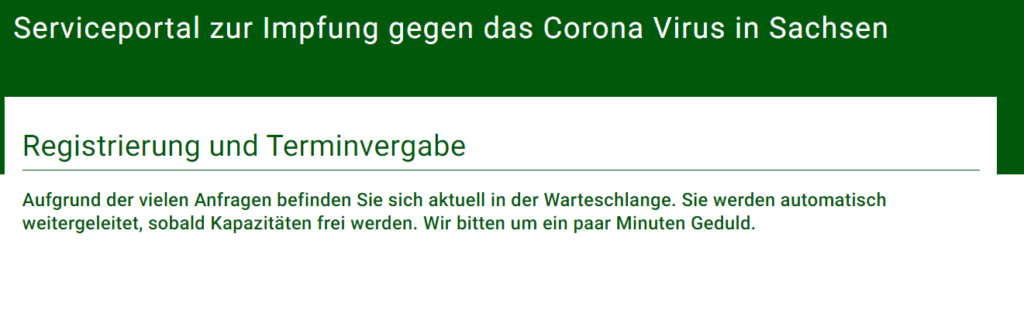
The organization of registering for vaccinations in Germany is… suboptimal. If you’re not on a waiting list of your doctor, you can try to get an appointment at one of the vaccination centers. However, there is no single waiting list for them. You have to try to register and see whether there is a free date available or not. Even worse, this procedure differs from state to state. For Saxony, this registration takes place at [1].

After making an account, one can try to get an appointment – if there is any available (which is unlikely for a random point in time right now). If you want to do so, you will have to wait for getting access to the tool every time. Yes, you read that right. A waiting queue. For a web service. That will very likely say you that there are no free time slots anyway as soon as you get through. Oof.

Come on. This is ridiculous…

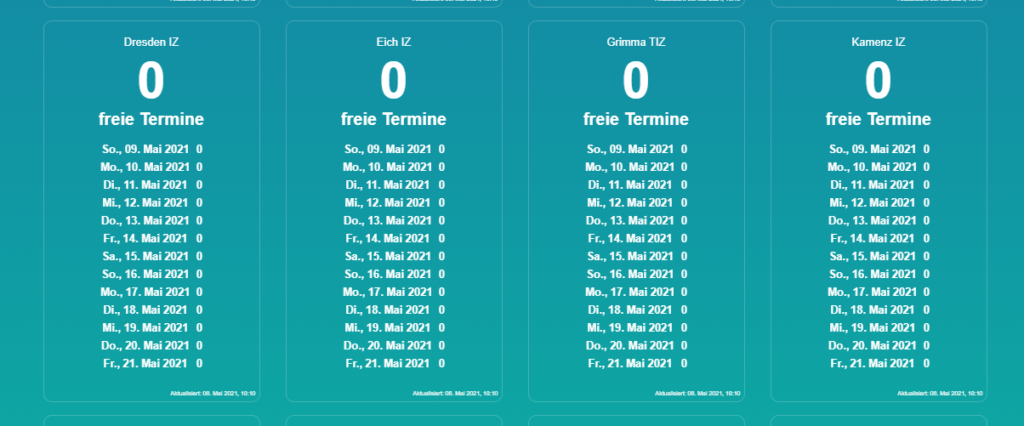
So at the Impfterminvergabe, you don’t see the number of free time slots at your vaccination center of choice in advance. However, there is a live counter available at [2] which you can use to save time. But we don’t want to watch the counter all day, do we?

I don’t want to watch this all day…

There’s where my Saxony Vaccination Data Autochecker comes in. The tool runs in the background and checks the countee page automatically every few minutes. If there are more time slots available than at the last check, you’ll get a notification in form of a message box.

This saves time!

Within the notification, you’ll see the information necessary to determine whether it’s worth to challenge your luck at the Impfterminvergabe again. You can just start this tool, do your daily Home Office work and forget about it – until you see that dozens of fresh time slots are available now.

Installation (Standalone)

  1. Download the latest standalone release at https://github.com/Luux/saxony-vaccination-date-autochecker/releases
  2. Either run it via command line (see options at the bottom of this README) or by double-clicking on a .bat starter

If you don’t want to use the command line, you can use a .bat file to start the program. As examples, you can just double-click dresden.bat or leipzig.bat and you’re ready to go (what the names mean should be self-explanatory).

Just double-click one of these. Or edit them for other vaccination centers.

If you want to check other vaccination centers, you can just modify a .bat file (right click -> edit) and specify the name of your vaccination center of choice as shown at https://www.countee.ch/app/de/counter/impfee/_iz_sachsen (for example “Annaberg IZ”).

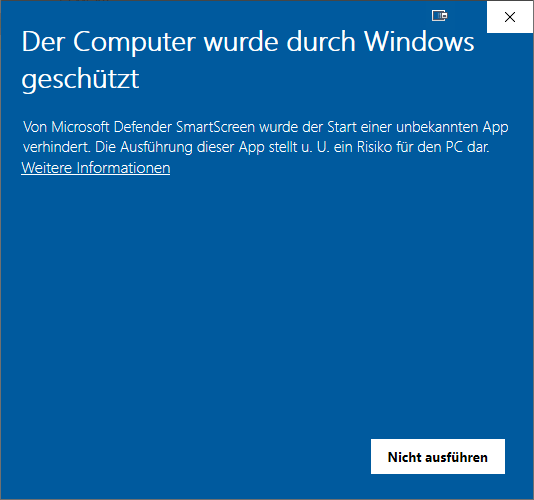
My Antivirus/Smart Screen complains, help pls?

No worries, these are false positives. The .exe is build using pyinstaller[3], which just bundles the script from this repository along with all dependencies including the python runtime into a single executable. Executables build by pyinstaller being suspected by Windows SmartScreen or antivirus solutions is a recurring issue (see for example [4]).

image
If this happens…
image
…right-click on autocheck_countee.exe
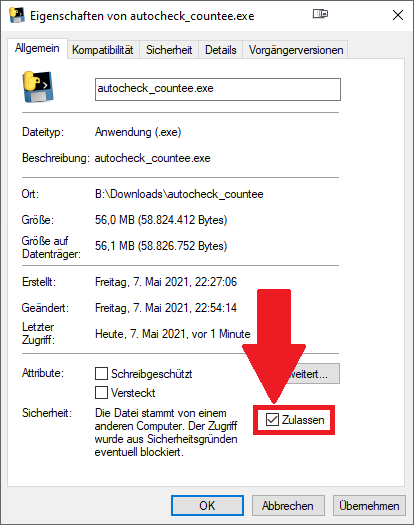
-> Properties -> Allow -> OK

You can also just run it from source as written below.

Installation (Source)

  1. Install python – latest version is fine: https://www.python.org/
  2. Make sure python is added to PATH
  3. pip install -r requirements.txt
  4. Start the script. Example usage: python saxony_vaccination_date_autochecker/autocheck_countee-py "Dresden IZ"

Options:

python .\saxony_vaccination_date_autochecker\autocheck_countee.py --help
usage: autocheck_countee.py [-h] [--intervall INTERVALL] vaccination_center

positional arguments:
  vaccination_center    The vaccination center name as displayed on countee.
                        Example: "Dresden IZ".

optional arguments:
  -h, --help            show this help message and exit
  --intervall INTERVALL
                        Check intervall in minutes (default: 10).

[1] https://sachsen.impfterminvergabe.de/

[2] https://www.countee.ch/app/de/counter/impfee/_iz_sachsen

[3] https://github.com/pyinstaller/pyinstaller

[4] https://github.com/pyinstaller/pyinstaller/issues/4852

ARBSMapDo 0.4.0 Released

> > Release @ GitHub

I recently released version 0.4.0 of ARBSMapDo, which is considered the biggest update of the tool yet. It brings several internal changes as well as many new features. The most important changes compared to the previous version are:

Start ARBSMapDo -> Paste playlist-URI -> profit.
  • Playlist support!
    Append your results to a playlist or create a new one. This supports the filtered mass-downloading as well as the manual DL described above. You can even download an entire playlist and append it to another playlist!
  • Detection of already existing maps
    ARBSMapDo now detects already existing maps, they aren’t downloaded again ARBSMapDo can be used along other tools. The hash calculation is cached, so it only has to calculate the map-hash for new maps downloaded outside of ARBSMapDo. In other words: it doesn’t have to perform the full scan every time the tool is started.
Custom song folders of Beat Saber players may look like that even if they never used ARBSMapDo – so we need to keep track of that
  • Added –noextract option to prevent extracting of downloaded .zip files. This can be useful for Quest users. The detection of already existing maps works with zip files as well as long as they are in the specified download directory.
  • Assistant improvements
    Some better formatting here and there.
  • Use beatsaver rating instead of vote_ratio
    You may have to change that in your presets if coming from older versions. The rating from BeatSaver is calculated using this formula:

So, what next?

I want to finally put this into a pypi package and look into the GameMode filtering, which requires some more under-the-hood changes. Currently, the tool scans ScoreSaber for levels, performs a pre-filtering based on the provided information, then looks into the more detailed BeatSaver information. As the latter is now cached locally using daily scrapped data, it has become much, much faster than previously. Therefore, a BeatSaver-first search can be implemented for non-ranked maps. That requires some additional work, but will be worth: users can finally keep their OneSaber playlist up-to-date!

Web Page Launch

Woohoo! The first iteration of my web page is finally ready to release. This is my personal web page, which includes information about who I am, what I do, how to get in contact with me and this blog. The latter is still kinda empty and I want to fill it gradually within the next months.

So what do I want to write about? It will not be limited to one topic. It may be a cool new project I found, a concert tour, some weird programming quirks, AI content, video games or whatsoever. It will follow the same principle as my web page in general: I don’t want it to have some corporate appearance. I am a human and I am a geek, and this is my very personal (web) space I want to invite the readers to. I want to show what inspires me – and maybe inspire others. (EDIT: 2020-12-10: I actually like the last two sentences and will use them on the welcome page from now on)

So, let’s get started with a few pieces of information about this web page. I’m using WordPress which is installed on a small V-Server instance. That means, in contrast to a managed hosting solution, I take the full control (but also responsibility) of my V-Server. While this indicates I have to do all the routing and software configuration, this also allows for the implementation of tools like Embetty or own software projects later on. Embetty allows for a privacy-friendly embedding of things such as youtube videos: the client (you) only communicates with Youtube servers once you click on the embedded video. Any communication with these servers is therefore completely opt-in. So how does this work? Embetty runs an own small server inside a Docker container. Each time a post with a supported embedding is requested, Embetty (which runs on my server!) requests the preview from youtube and serves this preview image to the client. Only if the client wants to start the video (and therefore opts in), a direct connection between client and youtube will be established.

Also, I configurated WordPress and some plugins so that no external sources are pulled by the client. I disabled WordPress Avatars and Emoji backwards compatibility which are on by default as they use external resources from US servers. Also, I do *not* use anything like Google Analytics, Akismet Anti-SpamPrivacy and so on. It is not as easy as one might think to make a modern web page privacy-friendly. As if that’s intended… 🤔

I also enabled comments. You can even post anonymously and don’t have to provide an email address if you don’t want to. However, note that this is subject to change if it gets abused or spam goes wild.

That’s it for now. I hope you will enjoy exploring my page! If you have any feedback or questions, please don’t hesitate to contact me. 🙂